Saturday, March 16, 2019

Linux Based DVR's

Ever need a DVR and just can't see forking out the money, when you a pile of old computers laying around ? Why not build a DVR instead ! Preload your favorite Linux distro, and then check these sites for best DVR software  !

1. ZoneMinder

zoneminder
ZoneMinder is an awesome option for a do-it-yourself surveillance system. Its vast feature set shapes ZoneMinder as the perfect solution for household security and home use, as well as commercial security.

Free and open source, APIs make integration quite feasible. Vast camera compatibility with both IP-enabled and analog camera support (what is an IP cam?). Android and iOS apps let you to monitor your cameras from anywhere.

There are loads of configuration options. ZoneMinder supports both live video and image stills. There’s event notification from email and SMS. Additionally, ZoneMinder offers user access levels, a nice touch. It’s pretty flexible with options to zoom, tilt, and pan cameras.

See site for more details and software.


Xeoma

OUR PREFERED CHOICE !
Childish Easy  !

Xeoma brands itself as “childishly easy” video surveillance. Fittingly, this DIY surveillance camera software was inspired by children’s toys. Essentially, it’s like Lego, but for system functionality. This security camera software is feature rich. It’s compatible with everything from analog cameras to webcams and Wi-Fi CCTV cameras. Amazingly, Xeoma can connect with up to 2,000 cameras from a single computer. That should be plenty for the average home user.

See site for more details and software.


3. Motion

Motion Output Linux
Motion Output Linux

You can probably guess from the name, but Motion monitors, well, motion. This free program detects if a major part of a picture from a video signal has changed. Written in C, Motion was created specifically for Linux distros with the video4linux interface. Since it’s built for Linux, Motion is a command line-centric tool.

See site for more details and software.

4. Bluecherry


Bluecherry is a cross-platform video surveillance client. There’s a bootable ISO, but you can also install Bluecherry via apt-get on Ubuntu and Debian. Currently, 2,800 IP cameras are supported. There’s both web playback and live viewing. Unfortunately, Bluecherry lacks a mobile app for Android and iOS.

See site for more details and software.

5. Ivideon

Ivideon Linux
If you’re seeking a really cheap video surveillance set up, consider Ivideon . The system requirements are among the lightest for any DIY DVR: you can easily run Ivideon with an Atom-powered PC, 1 GB RAM, and just 500 MB. However, it’s recommended that you have at least 11 GB for video footage per day. Installation is pretty simple. Either download and run the script, or install via command line.

See site for more details and software.

6. Kerberos.io

Kerberos Linux
Looking for a free video surveillance system that’s compatible with almost any camera and Linux? Check out Kerberos.io. In addition to installers for Linux (x86 and 64-bit), Kerberos provides Windows and OS X downloads as well. If you’re seeking an IoT set up, Kerberos is your best bet.
Not only is it free, but Kerberos.io can be deployed in multiple environments. There’s Raspberry Pi and Docker support among others. Notably, Kerberos has a clean, decluttered interface. Because it’s gratis, cross-platform, and simple to set up in just a few minutes, Kerberos.io is a best bet for both Linux and non-Linux users alike.

Although these are the best options with native Linux installers, other options are available for a Linux-based DIY surveillance system. For instance, there’s the route of using Windows software on something like the emulation tool Wine or in a virtual Windows machine on VirtualBox.

See site for more details and software.

Visit our growing group @ the Wireless Worlds COOP

Friday, March 8, 2019

XYZ Da Vinchi 3D Jr.1 Printer for class

Many has asked, so I figured why not write a few words of wisdom.

#1 have patience
#2 RTFM (read the friken manual)
#3 PC or Stand Alone ?

Like anything, the more you do it, the better you get at it.

#1 Have Patience

The learning curve is mid to high , based on the unit you chose.  Me I chose a XYZ Da Vinchi Jr 1, and PC based (windows 7) slicing /controller (already had working computer in stock).


I am impressed on the unit and the quality of prints. There is a few pros and cons about this unit but we can do that later.

Took me a whole day (12 hours) to get everything running 100 percent, so just relax and focus on each step.

#1 install the right software
call the support number and email for version recommended for your unit.  The version they gave me first didnt even see the spool , but the second worked but crashed. After doing and upgrade ( another mistake) the software no longer saw the attached printer ( not good).

always do backups, and roll back if you have to.

The best software version that worked best with my unit was :

xyzware 2.1.33.2 found here (worked good stable)

#2 read the manual, I know looks simple , read the manual anyway. It helps to read on how to load and unload material and other related procedures for decent quality prints.

More About Printer Here
User Manual here,
Unpacking Guide here

# PC/MAC or Stand Alone

Sure wish they made linux software , but  we had a windows pc ready with windows 7.  Software complains of not being the newest Open GL and memory ( we ordered.

Follow your setup/unpacking instructions to the letter, and enjoy !


Friday, January 11, 2019

Computers for Education Drive

Global IT Group (GIG)  has started collecting computers, parts and screens for 2019.

We plan on donating them pre-loaded with Linux and Internet ready.


Thursday, December 14, 2017

AirMatrix - AirMatrix LTE 3.65GHz Developers Needed


AirMatrix LTE 3.65GHz Pico Cell (base station) will be ready for testing in the first quarter of 2018.   We are currently looking for companies with an active 3 GHz license to help beta test our new *picocell system.

Phase 1: Deploy Pico Cell System Base Stations
Phase 2: Test existing LTE hardware vendors (Client Adapters, CPE, and ODU)
Phase 3: Co-Develop Air Matrix LTE Core

picocell is a small cellular base station typically covering a small area, such as in-building (offices, shopping malls, train stations, stock exchanges, etc.), or more recently in-aircraft. In cellular networks, picocells are typically used to extend coverage to indoor areas where outdoor signals do not reach well, or to add network capacity in areas with very dense phone usage, such as train stations or stadiums. Picocells provide coverage and capacity in areas difficult or expensive to reach using the more traditional macrocell approach.


Visit Airmatrix.org and join us !


New legs for my drone


Been a busy week, but started building 3d prototypes.

Please enjoy and share this !

https://www.thingiverse.com/thing:2700799

Tuesday, November 28, 2017

Ecommerce


TURKEYLINUX Magento


As we work to help providers establish hosted solutions, we started testing platforms . We do a full test drive and them report our findings. We test all types of hardware,  and software. With the demand for a turnkey Store, we set out to test the Turnkey Magento

There is allot of argument that Magento was the best, so we had to see for ourselves. This distro does not do the package justice in our opinion.

Tested ISO
http://mirror.turnkeylinux.org/turnkeylinux/images/iso/turnkey-magento-14.2-jessie-amd64.iso

We had major issues with the following:

Module: Installed , but not upgradeable
They are installed , but when you upgrade it fails dependencies

Upgrades: Broken
System wont let you upgrade , stating it was forked, ouch.


Wednesday, March 15, 2017

How to Build Your Own Rogue GSM BTS for Fun and Profit

How to Build Your Own Rogue GSM BTS for Fun and Profit


In this blog post I’m going to explain how to create a portable GSM BTS which can be used either to create a private ( and vendor free! ) GSM network or for GSM active tapping/interception/hijacking … yes, with some (relatively) cheap electronic equipment you can basically build something very similar to what the governments are using from years to perform GSM interception.
I’m not writing this post to help script kiddies breaking the law, my point is that GSM is broken by design and it’s about time vendors do something about it considering how much we’re paying for their services.
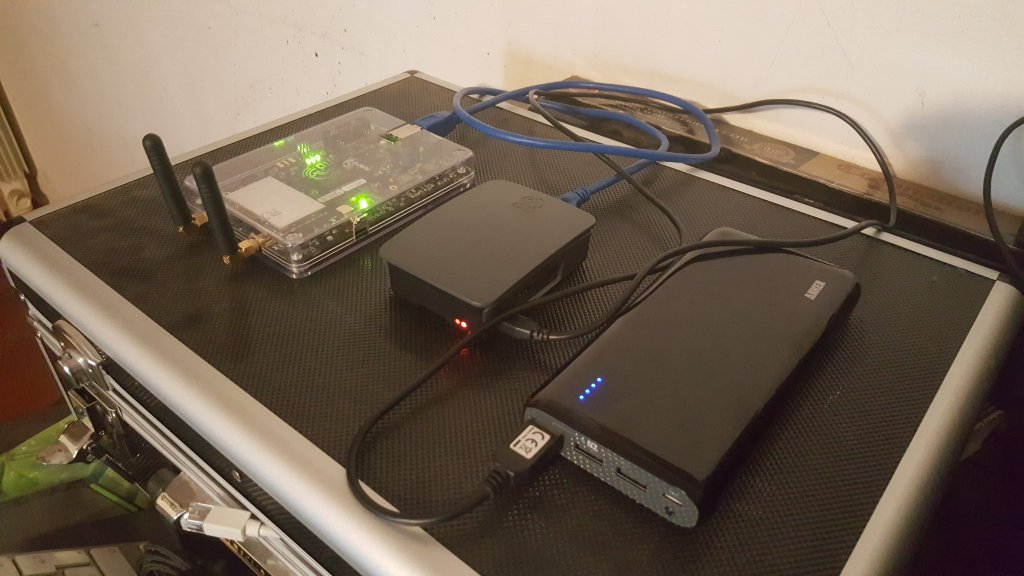
my bts

Hardware Requirements

In order to build your BTS you’ll need the following hardware:
  • bladeRF x40
  • Two Quad-band Cellular Duck Antennas SMA.
  • A Raspberry Pi 3 ( model 2 and below are too slow ).
  • An USB battery pack ( I’m using a 26800mAh Anker Astro E7 ).
  • A microsd for the RPI >= 8GB.
  • Some patience and time … :)

Software

Let’s start by installing the latest Raspbian image to the micrsd card ( use the “lite” one, no need for UI ;) ), boot the RPI, configure either the WiFi or ethernet and so forth, at the end of this process you should be able to SSH into the RPI.
Next, install a few dependecies we’re gonna need soon:
sudo apt-get install git apache2 php5 bladerf libbladerf-dev libbladerf0 automake
At this point, you should already be able to interact with the BladeRF, plug it into one of the USB ports of the RPI, dmesg should be telling you something like:
[ 2332.071675] usb 1-1.3: New USB device found, idVendor=1d50, idProduct=6066
[ 2332.071694] usb 1-1.3: New USB device strings: Mfr=1, Product=2, SerialNumber=3
[ 2332.071707] usb 1-1.3: Product: bladeRF
[ 2332.071720] usb 1-1.3: Manufacturer: Nuand
[ 2332.071732] usb 1-1.3: SerialNumber: b4ef330e19b718f752759b4c14020742
Start the bladeRF-cli utility and issue the version command:
pi@raspberrypi:~ $ sudo bladeRF-cli -i
bladeRF> version

  bladeRF-cli version:        0.11.1-git
  libbladeRF version:         0.16.2-git

  Firmware version:           1.6.1-git-053fb13-buildomatic
  FPGA version:               0.1.2

bladeRF>
IMPORTANT Make sure you have these exact versions of the firmware and the FPGA, other versions might not work in our setup.
Download the correct firmware and FPGA image.
Now we’re going to install Yate and YateBTS, two open source softwares that will make us able to create the BTS itself.
Since I spent a lot of time trying to figure out which specific version of each was compatible with the bladeRF, I’ve created a github repository with correct versions of both, so in your RPI home folder just do:
git clone https://github.com/evilsocket/evilbts.git
cd evilbts
Let’s start building both of them:
cd yate
./autogen.sh
./configure --prefix=/usr/local
make -j4
sudo make install
sudo ldconfig
cd ..

cd yatebts
./autogen.sh
./configure --prefix=/usr/local
make -j4
sudo make install
sudo ldconfig
This will take a few minutes, but eventually you’ll have everything installed in your system.
Next, we’ll symlink the NIB web ui into our apache www folder:
cd /var/www/html/
sudo ln -s /usr/local/share/yate/nib_web nib
And grant write permission to the configuration files:
sudo chmod -R a+w /usr/local/etc/yate
You can now access your BTS web ui from your browser:
http://ip-of-your-rpi/nib
Time for some configuration now!

Configuration

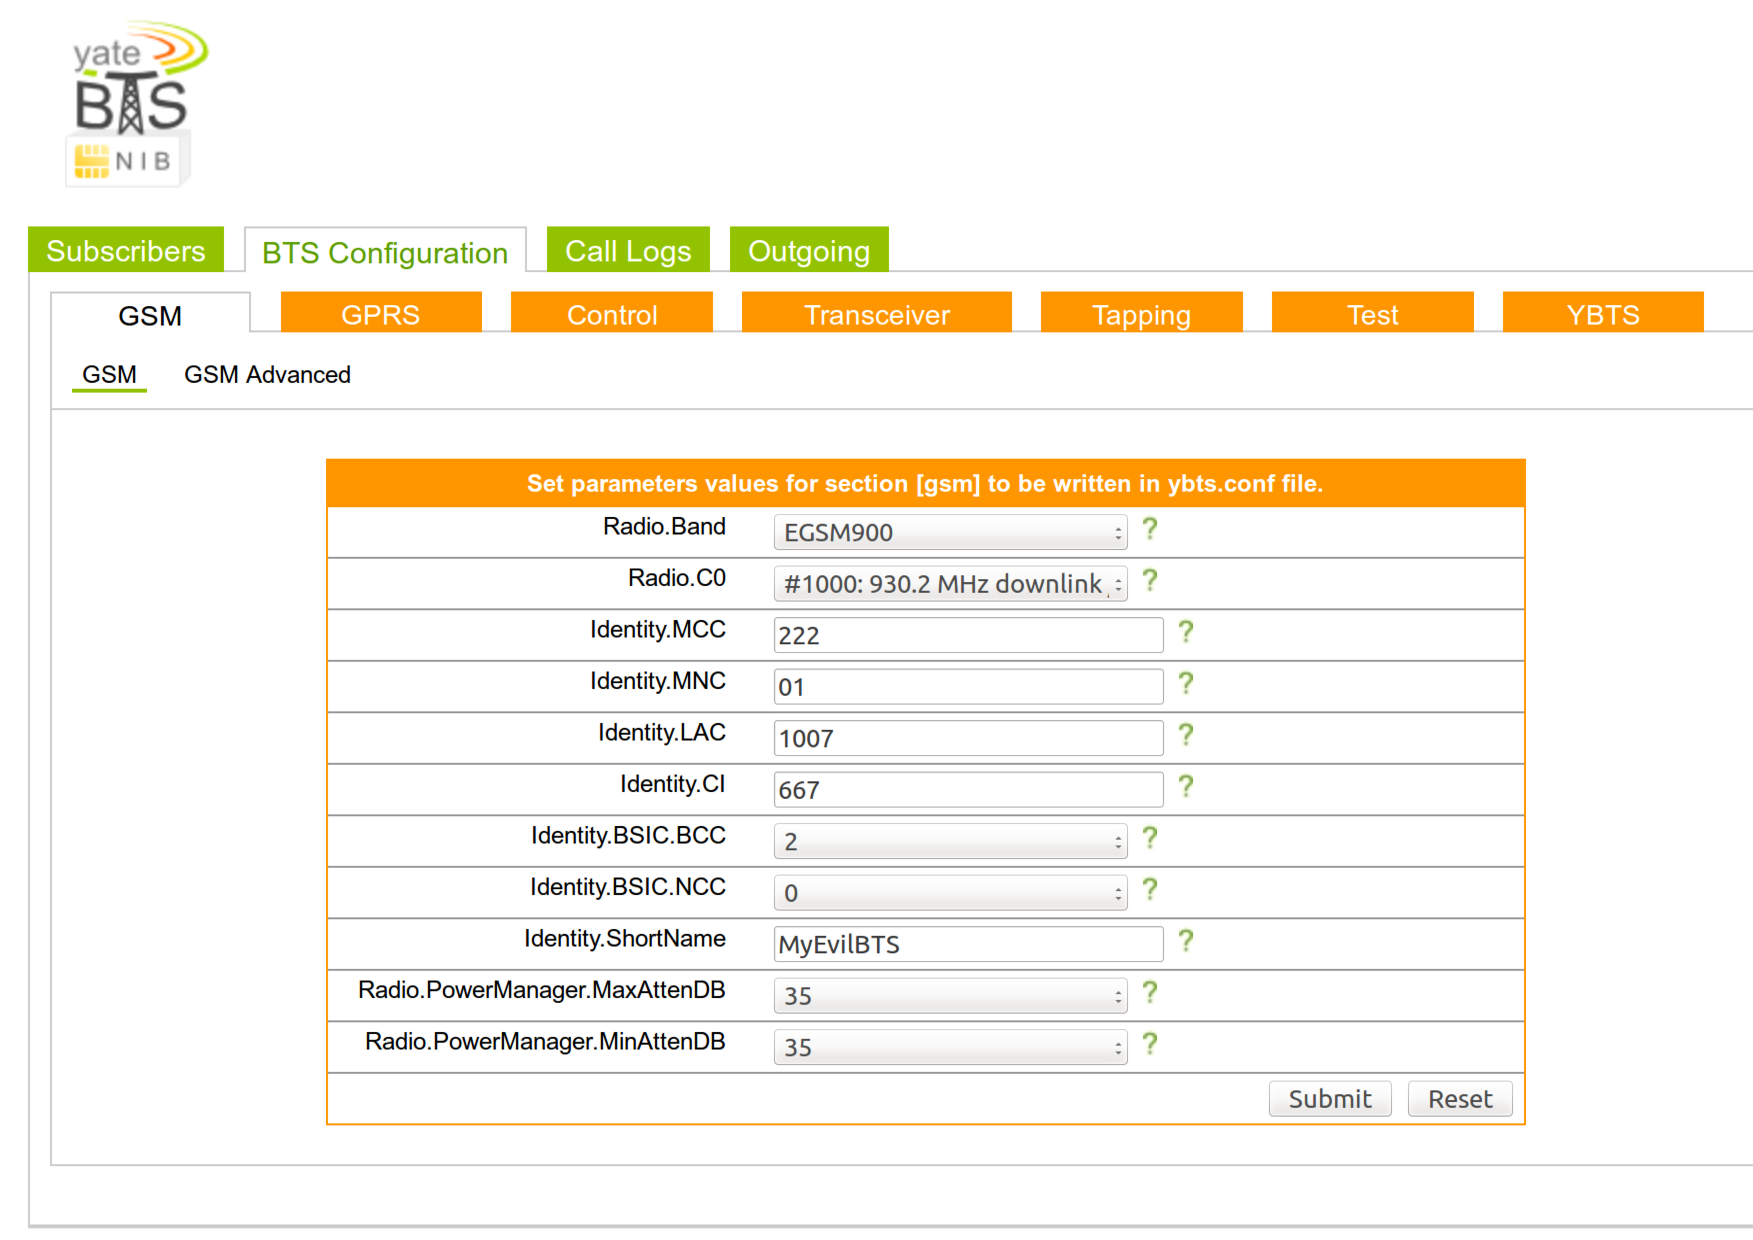
Open the /usr/local/etc/yate/ybts.conf file either with nano or vi and update the following values:
Radio.Band=900
Radio.C0=1000
Identity.MCC=YOUR_COUNTRY_MCC
Identity.MNC=YOUR_OPERATOR_MNC
Identity.ShortName=MyEvilBTS
Radio.PowerManager.MaxAttenDB=35
Radio.PowerManager.MinAttenDB=35
You can find valid MCC and MNC values here.
Now, edit the /usr/local/etc/yate/subscribers.conf:
country_code=YOUR_CONTRY_CODE
regexp=.*
WARNING Using the .* regular expression will make EVERY GSM phone in your area connect to your BTS.
In your NIB web ui you’ll see something like this:
NIB

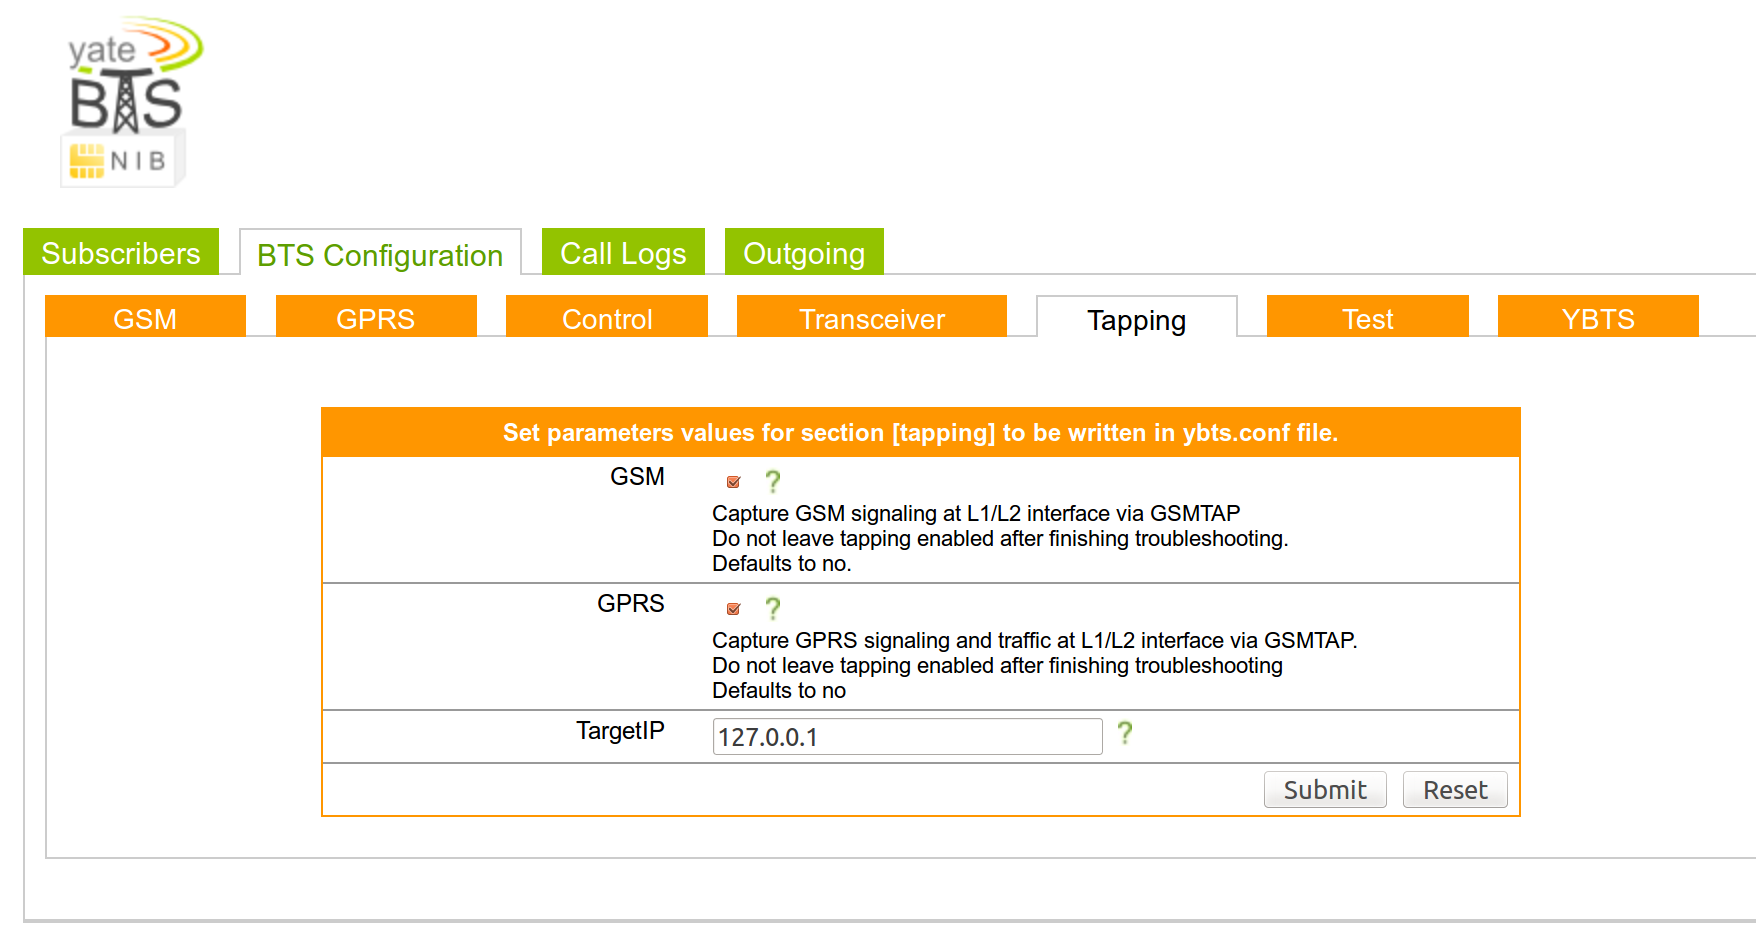
Enable GSM-Tapping

In the “Tapping” panel, you can enable it for both GSM and GPRS, this will basically “bounce” every GSM packet to the loopback interface, since we haven’t configure any encryption, you’ll be able to see all the GSM traffic by simply tcpdump-ing your loopback interface :D
tapping

Start It!

Finally, you can start your new BTS by executing the command ( with the BladeRF plugged in! ) :
sudo yate -s
If everything was configured correctly, you’ll see a bunch of messages and the line:
Starting MBTS...
Yate engine is initialized and starting up on raspberrypi
RTNETLINK answers: File exists
MBTS ready
At this point, the middle LED for your bladeRF should start blinking.

Test It!

Now, phones will start to automatically connect, this will happen because of the GSM implementation itself:
  • You can set whatever MCC, MNC and LAC you like, effectly spoofing any legit GSM BTS.
  • Each phone will search for BTS of its operator and select the one with the strongest signal … guess which one will be the strongest? Yep … ours :D
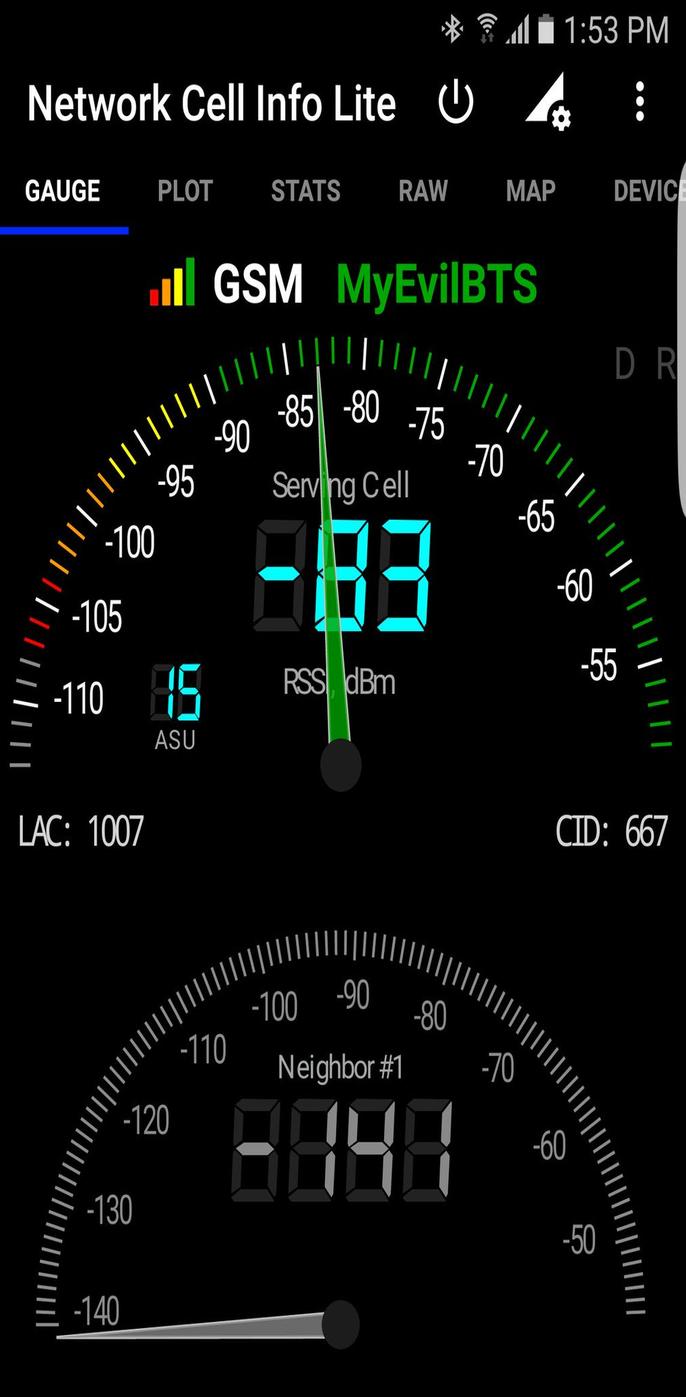
Here’s a picture taken from my Samsung Galaxy S6 ( using the Network Cell Info Lite app ) which automatically connected to my BTS after 3 minutes:
MyEvilBTS
From now on, you can configure the BTS to do whatever you want … either act as a “proxy” to a legit SMC ( with a GSM/3g USB dongle ) and sniff the unencrypted GSM traffic of each phone, or to create a private GSM network where users can communicate for free using SIP, refer to the YateBTS Wiki for specific configurations.
Oh and of course, if you plug the USB battery, the whole system becomes completely portable :)

References and Further Readings